

Bonjour !
C’est la semaine de la “Recette” chez Less is More et nous explorons le tamponnage sur plusieurs couches “Stamp Layering”…
Hello !
It is Recipe week over at Less is More and we are exploring Stamp Layering…

…et toujours avec notre sponsor de ce mois-ci Uniko. / …and always with our sponsor of this month Uniko.
![]()
1/ Stamp layering with Perfect Pearls
J’aime beaucoup cette technique que j’ai découverte sur le blog de Jennifer Mc Guire et je l’avais déjà utilisée dans le challenge #330. Il faut bien sur avoir des tampons à plusieurs couches. Ici c’est un tampon à 4 couches mais je n’en ai utilisées que 3.
I love this technique that I discovered on Jennifer Mc Guire’s blog and I already used it in the challenge #330. Of course you need to have a layered stamp. Here it is a 4 layers stamp but I only used 3).

 Sur un papier bleu foncé j’ai tamponné avec de l’encre Versamark la première couche de l’hortensia (le fond).
On a dark blue cardstock I stamped the first layer of the Hydrangea (the background) with Versamark.
 Avec un pinceau j’ai étalé une fine couche de Perfect Pearls afin de recouvrir toute la partie tamponnée.
With a brush I spread a thin layer of Perfect Pearls to cover all the stamped part.
 Puis j’ai tamponné dessus la seconde couche de l’hortensia et toujours avec de l’encre Versamark. La composition collante de cette encre enlève la couche de Perfect Pearls et fait donc apparaître la couleur du papier.
Then I stamped the second layer of the hydrangea and again with Versamark ink. The sticky composition of this ink removes the Perfect Pearls layer and thus makes the color of the paper appear.
 Et pour faire ressortir encore plus tous les détails sur les fleurs, j’ai tamponné la troisième couche avec une encre bleu plus foncée que le papier.
And to highlight even more all the details of the flowers, I stamped the third layer with a blue ink darker than the paper.
Pour le reste de la carte, j’ai tamponné une bande de papier bleu clair avec des boutons d’hortensia et de l’encre Versamark puis j’ai embossé avec de la poudre transparente. Le sentiment est tamponné et embossé à chaud avec de la poudre argent.
For the rest of the card, I stamped a strip of soft blue cardstock with hydrangea buds and Versamark ink, then I heat embossed with clear powder. The sentiment is stamped and heat embossed with silver powder.
Stamp: Altenew “Garden Hydrangea”, Simply Graphic “planche anniversaire”- Inks: Versamark, Altenew “Sapphire” – Embellishment: Ranger “Perfect Pearls”.
Challenges :
Simon Says Stamp Monday challenge : monochrome
Simon Says Stamp Wednesday challenge: Anything goes


2/ Stamp layering with layered stamps
Une de mes amies fête son anniversaire la semaine prochaine et je sais qu’elle aime beaucoup le rouge et le noir. Tout d’abord j’avais commencé la technique précédente avec du rouge mais je ne trouvais pas l’inspiration pour la carte alors j’ai laissé la fleur de côté pour en faire une autre en superposant tout simplement les différentes couches allant du plus clair vers le plus foncé.
One of my friends is celebrating her birthday next week and I know she likes red and black a lot. First of all I started the previous technique with red but I could not find the inspiration for the card so I left the flower aside to make another one by simply superimposing the different layers from the clearest towards the darkest.

 Sur du papier blanc, j’ai tamponné le fond de la fleur avec de l’encre Distress rouge puis j’ai séché avec le pistolet à chaleur avant d’appliquer la seconde couche.
On a white cardstock, I stamped the background of the flower with red Distress ink and I heat dried it before stamping the second layer.
La seconde couche et la troisième couches sont faites avec un dégradé de rouge de chez Altenew. Puis j’ai découpé à la main la fleur.
The second and third layers are stamped in a gradient of red from Altenew. Then I fussy cut the flower.
Sur une double carte blanche j’ai collé une bande de papier noir puis j’ai découpé un carré de papier blanc (même format que la carte) pour en faire 2 morceaux et je les ai embossé avec une matrice pour faire les pointillés.
On a double white card I adhered a black strip of paper and I cut a white square (same size than the card) to make 2 pieces and I dry embossed them with a stitched die cut.
J’ai collé ces deux morceaux sur la double carte avec de la mousse adhésive et j’ai collé la fleur à cheval sur les deux. Pour finir j’ai tamponné le sentiment et embossé à chaud et j’ai collé quelques gouttes.
I foam mounted the two pieces over the double card and I adhered the flower covering both pieces. To finish I stamped the sentiment and I heat embossed it, then I glued some clear drops.
Maintenant je vous montre la carte que j’ai finalement faite avec le premier essai et qui m’a été inspirée par le dernier challenge de Time Out.
Now I show you the card I finally made with the first trial and that was inspired by the last challenge of Time Out.


Beaucoup plus sobre dans ces tons noir et argent comme fond. Elle pourrait presque aller pour un homme.
Pour cette fleur, j’ai directement tamponné la première couche Versamark sur du papier rouge.
For this flower, I directly stamped the first layer Versamark over red cardstock.
Much more sober in these black and silver tones as a background. It could almost be for a man.
Stamp: Altenew “Peony bouquet”, Uniko “Simply said” (sentiment)- Inks: Distress “Festive berries”, Altenew “Ruby red & Grapevine” – Die: MFT “Basic stitch lines” – Embellishment: Ranger “Perfect Pearls”, Pretty Pink Posh “Clear Droplets 6mm & 4 mm”.
Challenges :
Stamploration October CAS card challenge : Anything goes (without the option)
CAS on Friday #119: Flowers
Time Out #95: Theme Sympathy (without the optional twist)


3/ Stamp layering by superimposing stamp over stamp in different tones
Pour cette carte je me suis amusée dans les superpositions de couleurs et de formes pour bien faire ressortir l’un comme l’autre.
For this card I had fun in the overlays of colors and shapes to bring out one like the other.

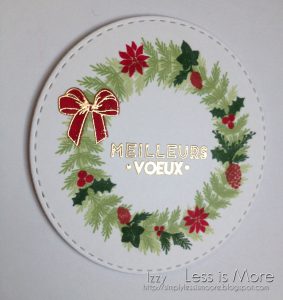 J’ai commencé par tamponner la couronne dans 2 tons de vert. J’ai ensuite tamponné les différents détails dans des tons plus foncés que la couronne.
I started by stamping the wreath in 2 shades of green. Then I stamped the different details in darker shades than the wreath ones.
J’ai tamponné le sentiment au milieu et j’ai embossé à chaud avec de la poudre or.
I stamped the sentiment in the middle and I heat embossed with gold embossing powder.
J’ai découpé la couronne avec une matrice de découpe ronde et je l’ai montée avec de la mousse adhésive sur une feuille blanche préalablement collée sur la double carte rouge. Et tada ! !
I die cut the wreath with a stitched circle die and I foam mounted it over a white cardstock which was previously adhered to a double red card. And tada !!
Stamp: UNIKO “Rustic wreath & Background builders: vines winter addition”, Florilège “Bonne Santé” (sentiment) – Inks: Altenew “Frayed leaf, Forest glades, Evergreen, Ruby red, & Grapevine” – Dies: Simon Says Stamp “Stitched circles ” & “Stitched rectangles – Embellishment: Simon Says Stamp “antique gold” EP.
Challenges :
ABC Christmas challenge: U for Unlimited
The merry Christmas challenge #40: Anything goes + Christmas
Christmas card challenges #24: Inspiration Photo
![]()


Je partage également une carte d’inspiration DT chez Uniko ce matin ICI et en voici ci-dessous un aperçu. C’est encore une autre technique de Stamp Layering et cela fonctionne également pour le thème d’aujourd’hui chez Less is More.
I’m also sharing a Design Team inspiration over at Uniko this morning HERE and here is a sneaky peek at my card below. It’s again another technique for stamp layering and it also works for today’s theme at Less is More.

Et voilà ! J’espère que ces cartes vous auront inspirés. Pour encore plus d’inspiration n’oubliez pas d’aller voir les créations de mes équipières sur le blog principal ICI et sur leur blog pour encore plus de surprise ! À vous maintenant ! J’ai hâte de voir ce que vous allez créer !
And Voilà ! I hope that these cards will inspire you. For even more inspiration don’t forget to go and see the creations of my teammates on the main blog HERE or on their blog for even more surprise ! It’s your turn ! I can’t wait to see what you’re going to create!
Merci pour votre visite et n’hésitez pas à me laisser un commentaire, je suis toujours ravie de vous lire. Bon WE et à très bientôt j’espère ! 😉
Thank you for your visit and feel free to leave me a comment, I am always delighted to hear from you. Have a nice weekend and see you soon I hope ! 😉
Beautiful work! I love the blue on blue, and that wreath is so pretty! Thanks so much for joining us at STAMPlorations CAS Challenge!
Lisa
Your posts are always full of inspiration! These cards are wonderful and so different from each other! I really enjoy visiting your blog!
Love your wreath – so pretty! Thanks so much for joining us at Christmas Card Challenges.
Wow, Isabelle … quelle merveilleuse collection mettant en valeur cette magnifique technique … elles sont toutes si belles … élégantes et si saisissantes! La floraison lumineuse sur le fond sombre et texturé est parfaite pour une carte de condoleances. Je suis d’accord, cela serait aussi bien pour un homme que pour une femme. Je suis ravie que tu as joué avec nous à Time Out! Hugs & bises, Anita 🙂
Wow you really were on a role! Love that technique, but haven’t played with it jet…think your cards made with it looks super, just like the other layered stamped cards! I do like the somewhat bold and still elegant flower on your card for TIME OUT! Thank you for joining us at TIME OUT!
Izzy you’re on fire with stamp layering here and so many wonderful techniques to share and inspire showcasing the challenge so perfectly. I love them all and can’t pick a favourite. I do adore the perfect pearl technique in the first one and such classy CAS use of the peony from Altenew. A wonderful festive Uniko wreath and even a designer inspiration spot too! Just brilliant! Hope you’re week is going well. xx
Beautiful cards. Thanks for sharing at The Merry Christmas Challenge.
Janis, Owner and Design Team Member
What a busy gal you have been. So many lovely cards, and I appreciate all the different ways you have shown how to do stamp layering. Thanks so much for entering one of your lovely cards at Time Out.
Beautiful card, thank you for joining in with the STAMPlorations CAS card challenge.
Wow you have been busy. All of these cards are just fantastic. So inspiring!
Lovely and elegant, so pretty silver finish. Thank you for joining Simon Says Stamp Monday Challenge!
Such a fun and beautiful technique on your first card, the pearl effect is stunning. Such classy and elegant cards…Thank you for the amazing inspiration, you are so creative x
Always inspiring to see your posts, Izzy, but this one was extraordinary. Just when I thought I’ve reached the end, another one pops up. All your cards are stamp layering masterpieces. I’ve been meaning to try that perfect pearls / VersaMark technique. You did a beautiful job and I’m sure it’s so shimmery IRL. I must say I love your Uniko new year’s card. So simple and so pretty. I will have to give that a try too. Have a wonderful week. xx
C’est une technique de tamponnage très intéressante et permet de donner plus de volume aux images.
Tu as travaillé sérieusement le sujet !
Tes cartes sont toutes sublimes et si soigneusement composées !
J’ai un petit faible pour la seconde pour son côté hyper clean !
Bravo !
Bises.
I love your beautiful wreath card – such a lovely CAS design.
Thanks for sharing with ABC Christmas Challenge and I hope you will join us again soon.
Hugs
Carol x
Once again you’ve been a busy bee Izzy. All gorgeous cards with lovely techniques. I bet the sheen on the first one looks amazing and the step by step photos are a great way to explain it. The two rose cards are really beautiful and your little wreath looks great with the pops of red to match the base colour. Thanks for the tip about Ardyth – I must look up her blog because I’ve been using that particular technique for donkey’s years since I saw it back in the early days of the Trimcraft forum, but I’m sure she does it much better than me. Enjoy your week xx
I still haven’t got around to trying the Perfect Pearls technique that you and Jennifer showcase. It is super pretty! And I do have some layering stamps that could do with some love. Your hydrangea card is super pretty, the blue looks so gorgeous with the PP. But your red/black card is so striking! The reds are just so deep and luxurious and that strip of black is just perfect, this design is fabulous. And your wreath is so dainty (I made a similar design just recently). Sometimes it is really nice to just stamp and not think about colouring an image. Thank you for sharing your beautiful creations with us Izzy, hugs, Lisa xx
Terrific designs, Izzy. I’ve been meaning to try the perfect pearls technique since seeing Jennifer’s video months ago. You’ve showcased the Altenew stamps brilliantly here, they are perfect for this technique. And I love your wreath card, such a classic and stylish design, loving the bow outlined in gold too xx
Such an inspiring post, Izzy! I haven’t tried this versamark stamp layering-technique yet but I think I must -the effects you have created with this look fantastic and so stunning, really a special look! All your cards have great CAS layouts and such pretty detailing that one can not want anything more added to them. Great job! And thanks for joining us at TIME OUT. 🙂 Have a fun weekend!
Je suis tres inspiree! Tu as cree des cartes magnifiques Izzy. J’ai hate d’essayer la technique avec les Perfect Pearls et la derniere carte avec les superpositions des couleurs est vraiment jolie (de la meme chose que la carte chez Uniko!). Bon weekend. Bises